You can easily send and customize email confirmations with Elementor forms.
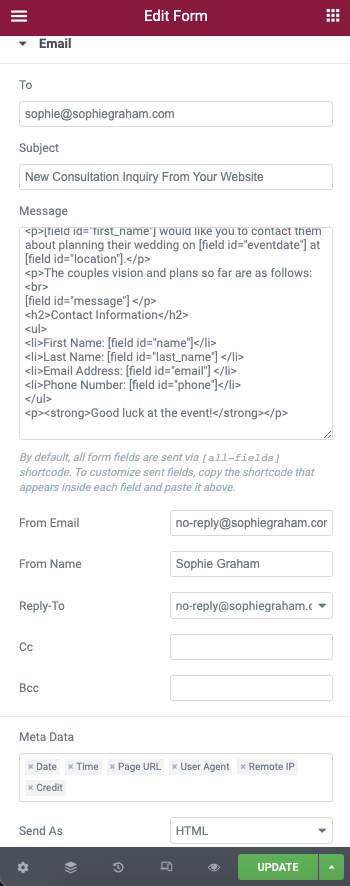
After adding a Form Widget to your section, Go to Actions After Submit > Add Action, and add Email.
Click the to open the Email section
- To: Define the site owner’s address. It’s added by default according to the email set in the WordPress admin.
- Email Subject: Type in your Email Subject
- Email Content: By default all form fields are sent via Shortcode: [all-fields]. To customize the content, copy the Shortcode of the field i.e
[field id="name"]etc. You can find the Shortcodes under Form Fields > Email (or any other form field) > Advanced. You can also build your own custom email via HTML. See example at the end of the article. - From Email: Type the From Email field
- From Name: Type the From Name field
- Reply-To: Type the Reply-To field. The Reply-To content is identical to the From Email field
- Cc: Type a Cc
- Bcc: Type a Bcc
- Meta Data: include additional Metadata in the sent email, such as Date, Time, Page URL etc.
- Send as: Send as HTML or Plain Text
Configure Email2
Email2 is very useful. For example, it could be a confirmation email received by your site’s visitor – immediately after he sent a form on your site.
To create one, go through the same process as above for Email.
Note: In the ‘To’ field you should input the shortcode located in the advanced tab of the email field [field id="email"].
Tip: You can personalize the confirmation email by using the submitter’s first name (‘Howdy [field id="name"]’).
Important: Please make sure that straight quotes are used rather than curly to avoid jQuery errors.
The HTML Part
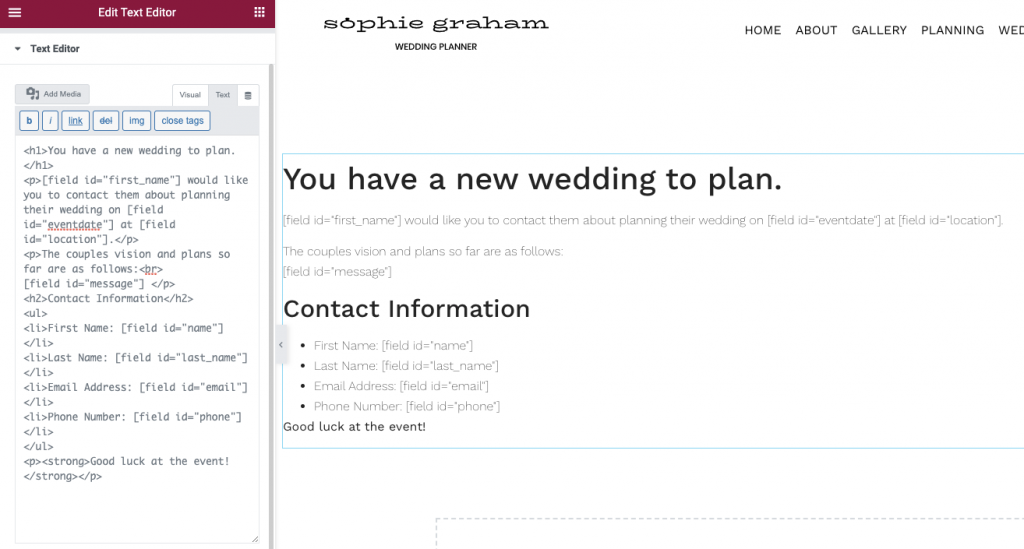
The following is an example template to use for this form. You will only need to use basic HTML tags to get started in this lesson but can build on this knowledge to create highly customized submissions. If you have no knowledge of HTML or access to any editor applications such as Dreamweaver, you may use the Elementor Text Editor widget to write the email template in the Visual mode, then switch to the Text mode and copy the HTML.

Example HTML
<h1>You have a new wedding to plan.</h1>
<p>[field id=”first_name”] would like you to contact them about planning their wedding on [field id=”eventdate”] at [field id=”location”].</p>
<p>The couples vision and plans so far are as follows:<br>
[field id=”message”] </p>
<h2>Contact Information</h2>
<ul>
<li>First Name: [field id=”name”]</li>
<li>Last Name: [field id=”last_name”] </li>
<li>Email Address: [field id=”email”] </li>
<li>Phone Number: [field id=”phone”]</li>
</ul>
<p><strong>Good luck at the event!</strong></p>
Note: Only shortcodes located in the advanced tab of the form fields widget can be used. You cannot use shortcodes from anywhere else here. Adding other shortcodes from other plugins or elsewhere will cause a server error message. The shortcode needs to be written exactly as it appears in the form field’s advanced tab.
Adding The Template To The Form
We can now add this HTML to our form using the Email options in the controls. Paste the HTML into the message field replacing the [all-fields] default. Make sure that the send as HTML option is enabled near the bottom of the controls.

More Form Options
This page outlines the Form Confirmations Options. For other Form options, click one of the links below:
